| Home Page
Contact Page
Mustang Photo Page1
Mustang Photo Page2
About Mustang's
Favorite Links Page
Guest Book Page
About Iguana's
Iguana Pictures
Cage Building.
Iguana Recipe.
Your Iguana Pictures.
Pic Page 1
Pic Page2
Pic Page 3
Pic Page 4
|
Photo Gallery
|
|
|
Iguana Condo
this is a nice thing you can build it yourself with some difficulties or you can but a hutch thing like it and just build on the inside |
|
|
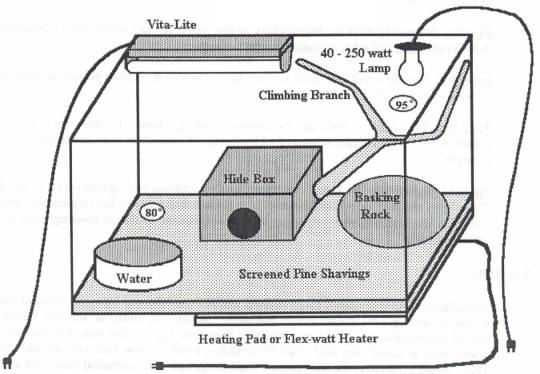
One way to set an iguana cage up
it is best if you leave out the heating pad and heat rock! only b/c with those things the food can cook in your iguanas stomach and make him ill
|
|
|
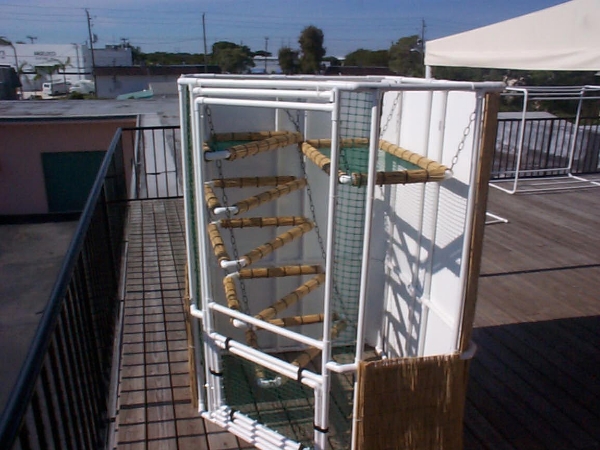
Iguana Jungle Gym
How to build this iguana jungle gym!!!
Frame!!!!!!!!!!!!!!
Start by making the panels...
They're pretty simple really:
Cut 3/4" pvc into 2 lengths of 41 1/2"
and two lengths of 22 1/2"
and 3 lengths of 13 3/4".The connectors are twoTs on top
two Ts on the bottom
and two 4-way crosses in the middle.
The trick to putting them together is to twist them in.
PVC can be pushed into a connector up to 1",
but I would suggest going in only 1/2" for now. You can
always tighten and straighten it up later -
once everything is together.
After you have made six panels,
your cage can start to take shape
by connecting the panels to each other with
corners and spacers.
Spacers are just 4 1/2" lengths of pvc that
connect panels to form the back walls.
Corners are just two forty-five degree angle connectors
joined by a 1 3/4" length of pvc
with two more pvc plugs in the ends.
You'll need to make nine sets of corners and
six 4 1/2" lengths of pvc to form your cage.
Go ahead and connect all the panels now.
Here's the shape you're looking for:
Making the frame was easy.
Next is the door...
Door!!!!!!!!!!!!!
The Front Door is a truly great feature of this cage.
The working hinges are a real convenience,
since you need to get into your lizard's enclosure several times a day.
Okay, let's get started.
We've got the frame all together ... right?
Did you notice that the six corners around the door are just
single 45 degree connectors (with the 1 3/4" pvc plugs on each side),
unlike the doubled-up 45 degree connectors that form the three back corners?
Go ahead and put those in, if you haven't already.
So, let's add the top and bottom of the door,
to complete the cage frame shape.
Cut two 26"poles from the 3/4" pvc.
Put the T connectors on the ends of each pole.
Go ahead and put them in to complete the frame shape.
Now it's time to get down to the door construction itself.
Here's what it looks like completed... for reference.
Let's build from the bottom up. To make the lower section of the door:
Cut two 24 3/4" poles and two 16 1/4" poles.
Assemble with three T connectors and one corner.
Cut two 1 3/4" pvc sections and put them in as shown: top and bottom.
The short sections sticking out of the two T connectors are
going to be hinges. To make them work well, you need to 'slot' them.
A jig saw works well to cut the slots. Be careful!
Set the whole assembly in the door frame and put a T connector on the top right side,
connecting it to the cage frame. See how nice those hinges work now?
For the left side, cut a 22" pole and top it with a T connector.
(No notches required - the hinges are only on the right side).
Next, cut a 5" pole and put it into the door on the left side top.
You can congratulate yourself now, because if you made it this far...
the rest will be pretty easy.
The top of the door is just like the bottom - except bigger and upside down.
Cut two 24 3/4" poles and two 35 1/2" poles.
Assemble with three T connectors and one corner connector.
Insert the two 1 3/4" sections of pvc into the two right-side T's, and slot them.
Add this top section to the cage door.
Cut another 41 1/2" pole for the lefthand side of the cage door frame.
Push and pull the pvc until the door fits nicely. Not bad!
Just one more tricky little thing to do...
Those wide gaps above and below the door have to be filled.
Cut two 25 3/4" pvc poles and put the Oversized T connectors on the ends.
(These are the four 1"x1"x3/4" T connectors).
Now here's the tricky part:
Use a jig saw to cut each T connector in half and trim their edges so they fit in the gap.
Cable tie the top one in place, so it doesn't fall out when you open the door!
Notice the 3" bolt and nut now added to keep the door securely shut.
Another bolt is positioned a similar distance from the bottom.
If you really want to go the extra mile and make an awesome door
here's how...
Use the same techniques you just used and make a small hinged door
to fit within the lower opening of the large door.
Start by taking that original right side 16 1/4" pole and topping in with
another T connector with a slotted plug.
Then shorten the pole (cut it to size) so that another T and slotted plug will fit on the bottom.
Trial and error fitting will give you a nice snug fit.
Use velcro loops to hold the lower door shut,
or you can just drill for longer bolts.
Cut oversized Ts in half and make two more gap-filling poles.
Cable tie in a mesh rectangle -- and you've got a
safe and easy way to get food in and out of the cage,
no matter what mood your iguana is in!
Now that's a great door!
The Roof!!!!!
The ceiling isn't so hard to make - and it looks and works great!
I produce the ceiling in two panels, but only because I have to ship them out.
You don't need to cut your ceiling in half.
At Home Depot, in the paneling department, are sheets
of melamine about 1/8" thick.
If you went shopping with the Material List, you already have
several of these 4 x 8 foot sheets, all cut up into the sizes you need.
Having Home Depot make the cuts for you is a huge advantage!
For the ceiling, it's fairly simple to make:
Place the 4x4 sheet on top of the cage and mark along the front door edge.
The measurements are generally 23 1/2" in from the front-most corner.
Cut the front corner off, leaving you with your ceiling shape.
Tip: cut from the shiny side and then sand the edge smooth.
While you're at it, cut off the three other corners, too.
Just measure 2 1/2" in from each corner,
draw a line and cut off the tiny piece.
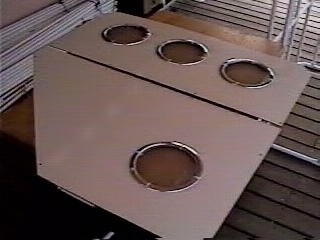
Now it's time to lay out the chrome trim rings...
You can use any layout you like. I like about 5 1/2" in from the edges.
Just make sure that you leave room for a UVb light fixture.
Take the four trim rings and lay them out on the shiny side.
Use a marker to trace the inside circle of each trim ring.
While your ring is still in place, mark North South East and west just outside to ring,
which will be where you drill holes for the cable ties that hold the rings in place.
Drill a starter hole just outside the circle trace and use an orbital jig saw
to cut a circle 1/2" outside of the traced circle,
that's about halfway between the circle trace and the hole marks.
The circle cut doesn't have to be a perfect circle --
because it's going to be hidden by the trim ring.
Use a drill bit that is just slightly larger than your cable-ties to drill four holes,
positioning the holes just outside of the edge of the trim ring: N S E & West.
Okay, now flip the ceiling over and cut a strip of uncoated wire cloth a little oversized.
That's about 10" wide by 36" long.
(That's Tom, by the way. He helped me build a few cages over the Summer.)
Now for the tricky part: slide a trim ring underneath, lining it up so that you can see one of the four
holes.
Poke the cable tie down through the screen and back up through the hole, and tighten.
(Hanging the panel over the edge of the table helps.)
The objective is to leave the cable tie 'squares' on top to hold the dome lights in place.
In fact, when you clip the ends of the cable ties, leave a little extra sticking up...
Okay, now flip it back over and drill a few holes 1/2" in from the outside edge
to allow you to cable tie the ceiling to the cage.
I'd suggest putting the ceiling on top of the cage and marking for the holes first.
I like to place the holes right next to the corners and T connectors.
One last thing, whether you cut your ceiling in half or not, it needs support...
Cut a 49 1/2" pole and put the 3/4" caps on each end.
The support pole sits up on top of the cage and the ceiling is cable tied to it.
That gives you plenty of support for all the stuff on top, like dome lights, a UVb fixture, the timers and
powerstrips.
See the support pole peeking out of the top?
By the way, those front mesh panels around the door could just as easily be white melanine.
I just like the 1" mesh for hand-feeding, clear viewing, and talking or listening.
Consider them as an option.
Back Panel!!!!!!!!!
The back panels are pretty easy - especially if you
have Home Depot pre-cut the pieces for you!
I cut the large back panels into two pieces for easy shipping...
Although you can just pretend that the seam is not there.
The full size of this back panel (ignoring that seam) is 37" wide by 68" tall.
Drill from the shiny side to make holes approximately every 6" to 12",
(which are for cable ties to attach the panel to the cage frame.)
The corners are a little trickier, but not much:
As you can see, the holes are drilled so that they line up with each other.
The narrow corner upper panels are: 6 1/2" wide by 43" long.
The narrow corner lower panels are: 6 1/2" wide by 24" long.
You'll need three of each for the whole cage.
That covers the rear corner and the two side corners.
If you look closely, you can see the in rear corner where the two pieces are joined.
The best way I've found to join those two pieces is to notch them.
I use a template:
The dimensions of this template are:
6 1/2" wide, with notches. To make the notches: mark 3/4" down from the top edges,
cut 1 1/2" in from the side edges, and cut back to the top edge with a 1/2" slope.
For the front two mesh inserts... I've been taking 1" green plastic mesh (5 1/2" wide) and
lashing it to bamboo poles (68" tall) using jute twine and a locking stitch.
But this a lot of extra work, when all you need to do is to
cut and notch more white melamine paneling or clear Lucite.
If you do, make these front panels slightly more narrow than the others: just 5 1/4" wide.
I just happen to think that these mesh panels improve the interaction -
and quality of life - of the cage inhabitant.
Maybe you could just use them in the Summer...
The only other melamine pieces you need now are for the lower sides under the windows.
Cut two panels 16" by 24 3/4" and drill holes that line up with the holes in the lower corner panels.
Remember to drill from the shiny side.
Now you can see why I add the bamboo trim.
The outside of this melamine paneling is just plain brown.
Isn't this better?.....
Windows!!!!
The easiest way to get nice windows is to have
someone else cut and drill the Lucite for you. :)
However, that aside...
If you start with two sheets of 32" x 44" Lucite (or a similar acrylic),
you can simply lay the sheets directly on the side panels,
lining up the sheet with the center of each pvc pole,
and use a marker and a straight-edge to draw cut lines.
You'll be able to get two side windows out of the one sheet.
The other sheet will yield the window portion of the front door.
To cut the Lucite, I prefer an orbital saber saw with sharp Bosch blades
although people tell me that scoring both sides deeply
and snapping gives a nice clean edge.
Once you've cut the windows to size, which will mean making three cuts total,
one across the bottom and two down the middle...
well, actually the one across the bottom is optional,
since the window can underlap the lower panel.
The dimensions will be roughly 15 1/4" x 43 3/4" for the side windows
and 26" x 44" for the front door window...
... depending on how accurate your cuts were and how tight the pvc is
in the connectors... There's a bit of flexibility in these measurements.
Use a sharp drill bit to make holes about a half an inch in from the edges.
I like to space them out to match the holes in the white side panels,
so that I can use just one cable tie -- through both holes and around the pole,
just like we did with the back panels.
Just hold the side window up to the frame and mark where the holes
need to be to match up with the back panel holes. Then drill, against a piece of scrap wood
to avoid cracking the Lucite.
Make sure that the cable tie square ends are flat against the Lucite and clip the excess.
The side window panels are attached to the outside of the cage frame,
just like the white back panels -- lining up all the holes.
The door window panel, however, is attached to the inside of the door frame,
so that you have the poles accessible to grasp, to open the door,
as well as having access to the bolts that keep the door shut.
Here's a tip: take the protective plastic off the Lucite before attaching it to the cage frame.
Another tip: If the cut edges of the Lucite present any dangerously sharp edges,
you can use thin white cloth tape to cover the edges all around, nice and neatly
Shelves!!!!!!!!!!!
These shelves are my favorite part of the cage to build -- and
they add so much style and function -- I just love 'em.
If you read my web page on the history of my cage-building endeavors,
(see Q&A), you know that I used to build my corner cages completely out of real bamboo.
However, practical considerations have eliminated almost
all of the real bamboo from my cages now.
The only bamboo you need for this project is what
Home Depot sells as 'Natural Reed Fencing'.
It comes in 15' x 20' rolls for about .
You'll have enough for the shelves, and enough left over
to add some beautiful trim to your new enclosure.
(Home Depot will transfer a roll to your local HD store, if you ask.
Florida HD stores carry this year 'round.)
One roll is enough to do the shelves, some
exterior cage trim, and you'll still have enough left over to get creative with.
If you're making this cage-building project a family affair,
you can get someone started on making these shelves right off the bat.
Let's start with the corner shelves...
The measurements are:
(1) 26" pvc pole for the front
(2) 19" pvc poles for the sides.
Assemble as shown with two 45 degree angle connectors joined in the rear corner,
and one 90 degree connector joined with a 45 degree connector on each side.
Use three 1 3/4" pvc sections to join the connectors.
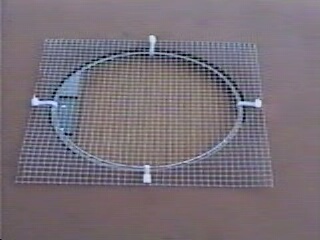
Next, cut a piece of plastic mesh to fit the frame.
To keep the mesh from rolling, I attach it with a couple of ties,
while I cut it down the center of the pvc poles.
Once the mesh is cut to size, attach it to the frame with ties
every 4 or 5 inches. Clip the excess tail ends from the ties.
Using 3/4 pipe insulation, cover the frame.
This adds thickness to the shelves, as well as
helping keep the bamboo in place (from spinning when climbed on)
on the lower shelves - the ones without floors.
The bamboo has been cut into 7" wide strips and then
had the outer few bamboo sticks removed so that
the remaining wire can be twisted together and folded under.
The 6 1/2" bamboo strips can be cut to size with strong scissors.
Use 11" black cable ties over the bamboo. Pull the ties tight
with pliers so that the tails are underneath the shelf
and clip the tails off.
Make four more of these, omitting the floor. For the chains,
make 17 sections of 9 links each to connect
each shelf. The bottom shelf only gets two chain lengths -- up front.
Attach single, open links to the cage frame top with cable-ties,
then just lift the stack of shelves into the cage and
hang them from the open links.
This allows you to easily install or remove the shelves,
just by lifting them off of the open links cable-tied to the cage frame.
Use the same 'open link' technique at the floor level to stretch the shelves
across the cage so that they cascade down under the Basking Hammock.
This allows you to un-hook the shelves and let them just
hang straight down in the enclosure, giving you room
to step into the cage for cleaning or
spending a little quality time with your iguana.
To make the Basking Hammock, just use the same techniques
with these measurements:
Cut (2) 33" pvc poles
and (2) 17" pvc poles.
Assemble with four 90 degree corner connectors.
Add the mesh floor, pipe insulation and bamboo,
all held together with cable ties.
Attach chains with 10 or 11 links to the rear corners.
I like to use several extra links in the front chains
to create a slight forward angle.
Using the 'open top link' method to hang the shelves also allows
you to adjust how close the shelves are to the lights
Floor!!!!!!!!!
Repeat roof step for floor but leave out lighting holes!
|
|
|
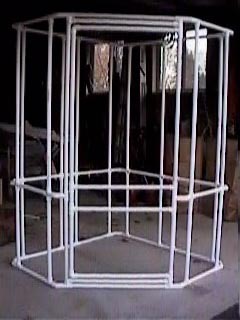
frame structure for jungle gym!
this is what the sturcture for the cage will be when your done with the stucture of course!
|
|
|
lighting hole for jungle gym....its on the roof
|
|
|
roof when done!
|
|
|
go to Iguana photo page 3 to see more of the jungle gym and an iguana food recipe (not for you to eat for your iguana to eat!)
must finish page three! well im off!!! bye! hope you enjoy the new things i put up! |
|